How to use the DSI
I generally do the following.
1) Subtract Darks unchecked.
2) Find the object and focus (or focus on a nearby star).
3) Perform some test exposures to determine the appropriate exposure times.
4) Shoot the dark frames for that exposure time.
5) Select Subtract Darks.
6) Take your light frame exposures.
==================================================================================
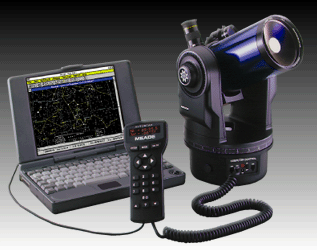
There are essentially 3 ways of using your ETX125 with a camera.
1. Mount camera (SLR type) on rear port of telescope using T-mount and Meade
adapter. Probably needs you to use the 'scope in equatorial mode, as
there's not enough clearance in Alt-Az mode. Has the advantage that image
doesn't rotate during long exposures. Care necessary during initial
alignment to stars, as the stars chosen may try to force 'scope tube (OTA)
to a position where a physical clash is inevitable.
2. Mount (small) camera above upper eyepiece port using some form of
adapter. (For my Sony TRV22 camcorder, I used the DigimaxT 40 which has the
advantage that it's adjustable to minimise vignetting.) Balance was
achieved by having a weight on a rod projecting forward of the OTA and
mounted to the pair of screws beneath the rear OTA. Balance weight assembly
was made easily attachable/detachable so that initial alignment could be
achieved with no risk of physical clashes. I used equatorial mode for the 6
hour Transit of Venus - during this time the effective rotation of around 60
degrees (so as to keep image un-rotated) caused major out-of-balance
sideways forces which had to be considered and managed.
3. Mount camera plus its own lens* above the 'scope tube using a piggy-back
mount screwed into the 2 holes situated beneath the 'scope's tube. Have
tried this briefly, and it's inherently unstable with large masses way above
the mechanical axes - and where do you put the balance weights?
==================================================================================
I can explain you why current version of K3CCDTools doesn't save part of captured frame (some explanations were simplified, to make explanation more clear):
1, K3CCDTools saves AVI files in native camera format. For color image it is usually kind of YUV format (provided by webcams). To save a part of image, you must decode the image and save it in RGB format. Original YUV format from webcams is 12bit, while RGB is 24bit. Decoding from YUV to RGB doesn't gain any additional information, although it is 24bit, because the whole source information is coded in 12 bits. So if you capture in YUV, you are getting half sized image data (and thus also AVI file) in comparison with RGB format.
So if I captured sub-image of captured format, it would have to be less than 1/2 of original captured area to gain some disk space capacity.
For grayscale camera the situation is different - you capture 8-bit data and in this case you can have higher storage gain when you save only sub-image (but see 2,).
2, K3CCDTools is able to process captured AVI files and export any part of captured frame to many formats (including AVI).
I consider this approach as more safe in comparison with runtime cropping during capturing, because at processing time you have available as much data as possible and then you can decide what data you consider unnecessary and crop it.
3, When you are capturing in YUV format, then after decoding to RGB and cropping you are loosing information about Y channel.
4, There exists a driver for ToUcam cameras, which enables capturing in full resolution in 352x288 format (cropped full resolution format)
5, After processing I usually archive the AVI files compressed by RAR or ZIP (size of RARed file is only a fraction of original file)
6, The information in "black" areas may also appear as useful - you can use it for noise profile analysis. In case, when it is really black (without noise), then it is very well "compressable" by RAR or ZIP.
7, When you save the whole image, then you can use dark frames and flat field frames captured later (important mainly in deepsky imaging).
==================================================================================
The "Kochab Method" has been described here
http://www.arksky.org/Kochab.htm
Finding the DIRECTION of Kochab from Polaris,
to find NCP appears to be relatively easy.
However, determining the distance of 43 arc minutes(43'),
needed to offset Polaris toward the NCP,
seems to be more difficult....
You're making it harder than it needs to be. Unless your scope has a
very short focal length and your chip has large physical dimensions,
you probably won't be able to fit such a large distance (43
arcminutes) on the chip.
Do you have a finder scope? If so, there's an easy way to find the
diameter of its field of view. Turn your scope's drive off so that
it is stationary. Point it at the celestial equator, with a bright
star at the crosshairs. Watch how far that star drifts in 172
seconds (2 minutes 52 seconds). That amount of drift equals 43
arcminutes (a star at the celestial equator moves across the sky one
arcminute for every four seconds of clock time). Now you know how
far Polaris needs to be offset from the central crosshairs for the
Kocab Clock method to work, assuming that your finder scope is
perfectly aligned with the main scope.
==================================================================================
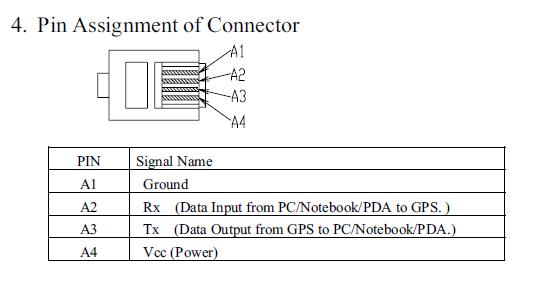
Connect ETX to your PC
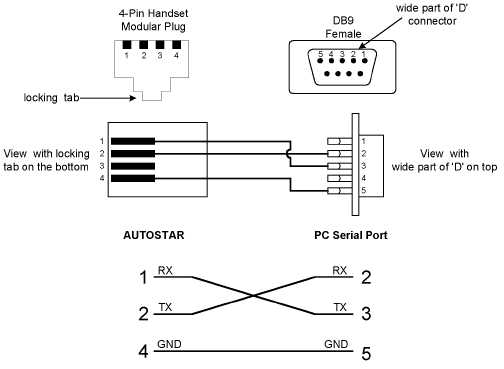
============================
Leadtek GPS muis